How and Why To Set Up Google Search Console for Your WordPress Site

Google Search Console, formerly known as Webmaster Tools, is a must-have for your WordPress site. It is a free account which will give you a lot of useful information about the search health of your site. Additionally you’ll get valuable SEO data about keywords, click through rates etc, which you could not otherwise get in Google Analytics alone. There are other uses and features of Search Console, but in this and the next post, I’ll be focusing on the marketing uses of Search Console.
How to set up Google Search Console
1. Sign up
Go to https://www.google.com/webmasters/tools and sign in with the same Google account you use for your Analytics etc.
2. Add your site
The next step is to “Add a property.” A property just means a website (or app).

You should use the primary version of your URL. Most sites are accessible whether you type in your domain with or without the www in front of it. But usually one version is primary meaning that, no matter which other version you type in, you get redirected to the primary version. If the www version of your domain is the primary one, it means that if you type in your domain without www, you will get redirected to the www version. You can simply visit your site and see at which version you end up. The same can be true of http and https. If you use https, but type in your website using http, you should be redirected to the https version.
If your site has separate versions which don’t redirect, you should add each of them separately, but tell Google what your preferred domain is.
3. Verify ownership
Google needs to make sure you actually own the website you’re trying to set up. You’ll be presented with a few possible methods for this step. The easiest way is with Google Analytics, assuming you have that set up on your site (you should!):

If you can’t do it that way and you’re not tech-savvy, the easiest way is probably to choose the HTML tag method because you can use a plugin like Yoast SEO to help you do that.
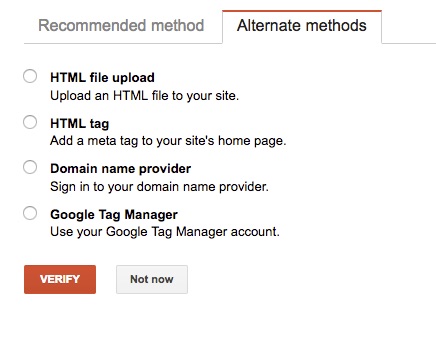
After selecting the HTML tag option, copy the meta tag provided, it looks something like this:
<meta name="google-site-verification" content="3Gadfmbf934asfahefq83oghbuUbp3o3SyFa-044c" />
Then in the Yoast plugin, go to SEO > Dashboard > Webmaster tools
Paste in the meta tag (the plugin will remove any unneeded parts)…. and you’re done!

Now go back to Webmaster tools and click Verify and you should have a confirmation message of successful verification.
4. Submit your sitemap
You’ll have to make sure that your site has an XML sitemap. That’s easy to do with most SEO plugins, like Yoast SEO , or All in One SEO.
Whichever one you use will generate an XML sitemap for you and provide you the URL.
It will be something like example.com/sitemap.xml
Once you have that, go to Crawl > Sitemaps in Search Console
Integrate search console into Google Analytics
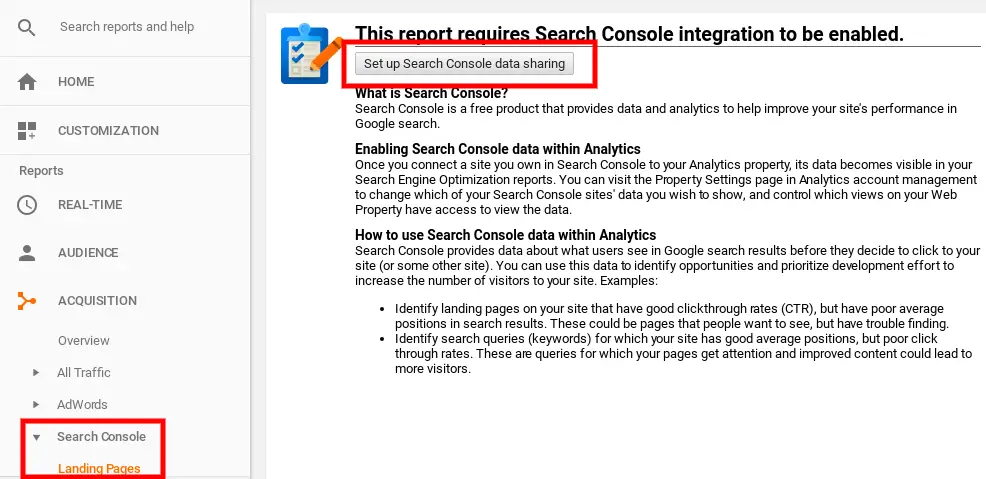
This is a very important step since it will provide you with a lot of valuable SEO information, such as which search terms your site ranks for, what the click through rate is etc. You can’t get this from Analytics alone.
Log into Analytics, go to Acquisition > Search Console, click on any sub menu and you will see the prompt for search console integration
Click on Set up Search Console data sharing
You can also get to it by clicking the Settings icon at the bottom left and then clicking on Property Settings.
You don’t need to worry about most of the settings for now, you can always go back and activate advertising features, for example. For now, you have to click on “Adjust Search Console”:
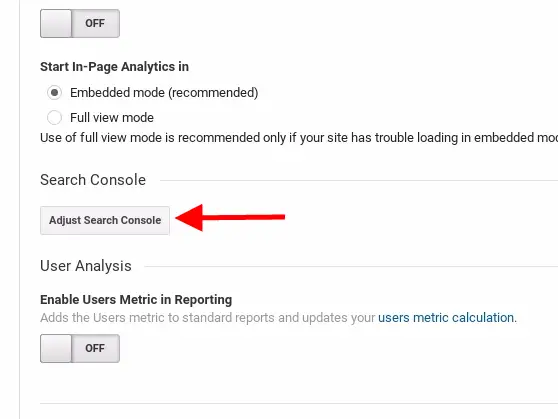
- Click Add, and a new tab will open. Select your site from the list (if multiple are listed), then click Save at the bottom.
- Your site will now be listed in your search console account.
- Go back to the Analytics window you started in and click Done.
- You won’t see any data immediately but after a period of time, you’ll start to get some valuable information.
By completing the integration with Analytics it allows you to see the search engine related info inside your Analytics account. If you don’t complete the integration you would have to log in to Search Console to see everything.
Additionally, by using search console info within Analytics, you can see it within the context of other factors like conversion rates, bounce rates and other metrics that you only get in Analytics.
In the next post we’ll get into the fun stuff of how to use the data search console gives you, to improve your SEO.