The Complete Guide to Using The Yoast SEO WordPress Plugin

Table of Contents
This guide is current as of March 2017.
While some general aspects of SEO will be touched on in this guide in the course of explaining the plugin, beginners may find that they need a more fundamental understanding of how SEO works in general, in order to get the best use out of this plugin. I have written an ebook that addresses that need:
The Beginners’ Guide to SEO for Business
Yoast SEO is on most lists of ‘must-have’ WordPress plugins. But the extensive set of options it provides can seem intimidating, especially to newer users.
Yoast has a fair amount of commentary and explanatory text throughout the plugin screens so I won’t duplicate anything he’s saying there, but I’ll try and clarify the less obvious parts.
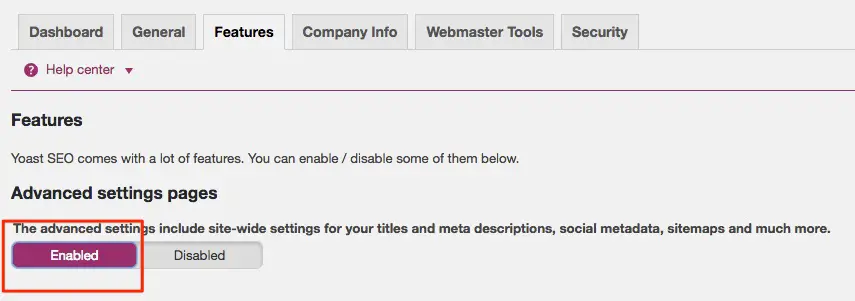
If you’ve used an older version of Yoast on a site, there are several menu tabs you’re used to seeing, that are hidden by default on first activation of more recent versions.
To access all of the settings referred to in this guide, you will need to activate the Advanced settings.
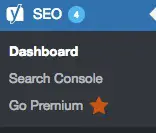 You will know if you’ve already activated this by the menu options available. If you have not activated Advanced, you will only see Dashboard, Search Console and Go Premium on the left.
If that’s the case, go to Dashboard > Features > Advanced settings pages and click Enabled:
SEO > Dashboard
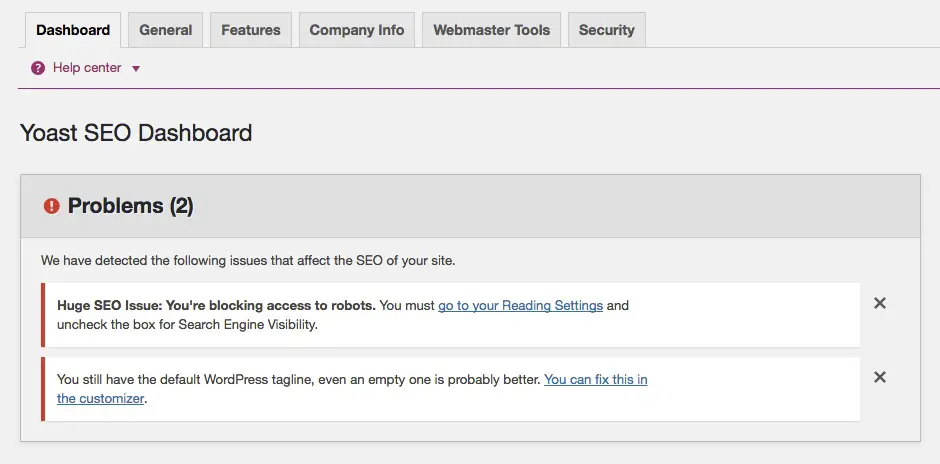
This tab will display problems and notifications to alert you of potential issues on your site:
SEO > Dashboard > General
From here you can access the configuration wizard and restore the default plugin settings.
Configuration wizard
This “wizard” provides a 10-step process to configuring a few key settings in the plugin. I don’t personally find it that useful, but your mileage may vary. There’s nothing here that can’t be accessed through the normal settings screen, so this is not a mandatory process.
Steps 4 – 9 are the most pertinent:
Step 4: Company or Person
Step 5: Social Profiles
Step 6: Post Type Visibility
Step 7: Multiple authors
Step 8: Google Search Console
Step 9: Title Settings
SEO > Dashboard > Features
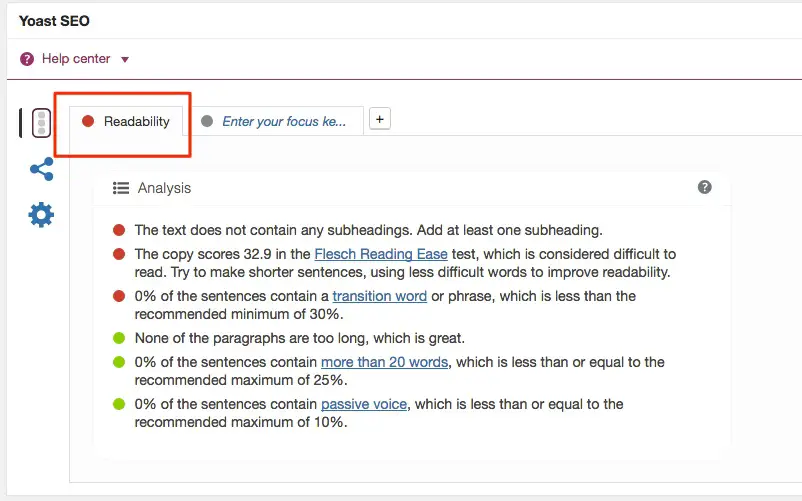
Readability Analysis
This tool gives suggestions about the readability of your content – how hard or easy it is to understand etc. It favors easy to understand text – short sentences and a reading level appropriate for 13 – 15 year old students, based on the Flesch measure. I personally don’t use this feature because I think my audience has a higher reading and comprehension level.
Once disabled, it will remove this section from the Yoast SEO box on post/page edit screens:
Keyword Analysis
This tool enables you to enter the keyword or phrase for a given post and the plugin analyzes your content to see how well you’ve optimized for it. If you are just learning about SEO, it can be useful, although a lot of people misuse it. I explain how to use it properly in the section dealing with optimizing individual pieces of content.
Once disabled, it will remove this tab:
Advanced settings pages
Enabling this will give you back all the features you are used to seeing in the Yoast plugin if you’re a long-time user.
You can also enable / disable the Admin bar menu
OnPage.org
Enable / disable the onpage.org indexability check. This performs some tests to make sure everything is OK with your site and verifies that it’s available for indexing:
“They fetch the homepage of your Domain and check a couple of things in order to make sure, everything is fine with your site.”
More info on the specifics: https://en.onpage.org/lp/yoast/faq/
I personally have never had the need to turn it off, but should it cause any issues, you can disable it. Per the link above, issues generally involve false positives, rendering the feature useless in those cases.
SEO > Dashboard > Company/ Your Info
The website name is for display in mobile search results. Previously the domain name would be displayed, but now you can choose your website name instead. See screenshot below. Currently it’s only used in mobile results, but it’s possible it could port to desktop in the future.
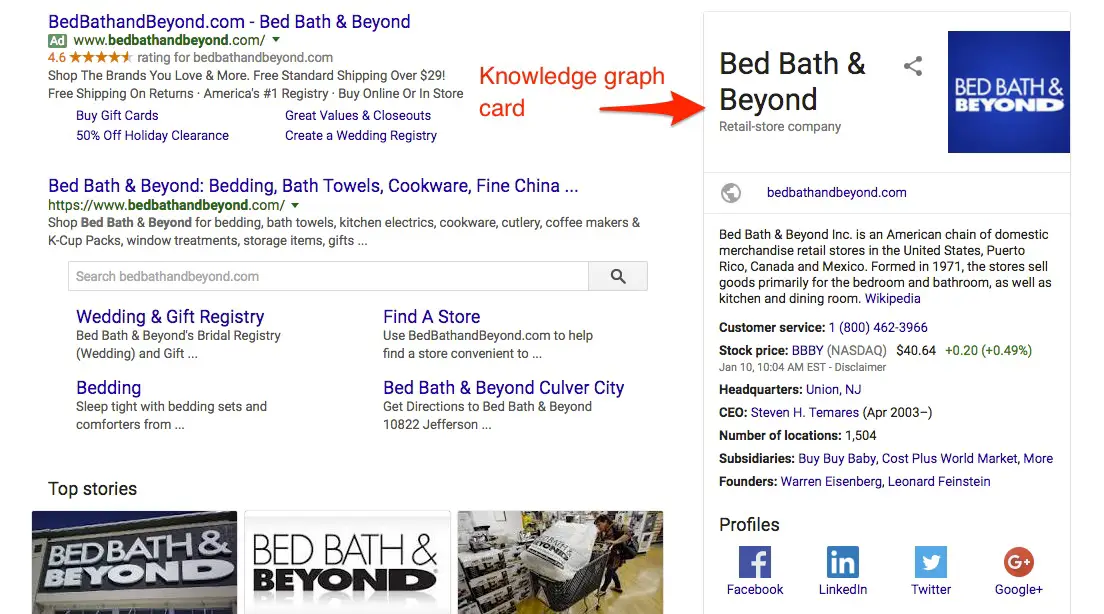
Company or Person
This is used only for Google’s Knowledge Graph. The Knowledge Graph is part of structured data, specifically to provide at-a-glance information in search results for certain ‘authorities’.
For example, if you do a search for a brand, you’ll likely see a Knowledge graph card in the results:
SEO > Dashboard > Webmaster Tools
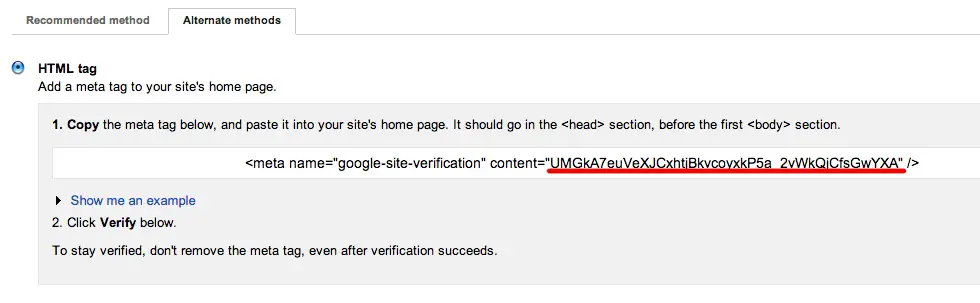
Yoast provides a very handy way to verify your site with Google Search Console (formerly Webmaster Tools), Bing webmaster tools and Yandex. Alexa used to be available here but Alexa themselves retired their “claiming” feature, so it’s no longer needed in the plugin.
Each of those services will give you a meta tag to paste into your code as a method of proving your ownership of your website. However by pasting the meta tag here you can save yourself the need to touch any code – the plugin will add the code for you.
Google Webmaster Tools is a must-have account since it will give you useful information about the health of your website, and will provide enhanced info inside your Google Analytics account.
Bing webmaster tools also provides some helpful info, including a good keyword research tool. Yandex is Russia’s biggest search engine.
Below you can see the meta tag that Webmaster Tools provides you. The underlined part is what you will paste into this field of the SEO plugin (although even if you paste in the whole thing, the plugin is smart enough to clean it up for you ;) ).
SEO > Dashboard > Security
If you are an advanced user, enable this since it allows you to noindex pages and a few other things. If you don’t need it, you can disable it, particularly if you have multiple users on your site that might wreak havoc with this. Below is a screenshot of the box that will be added when this option is enabled.
SEO > Titles & Metas
SEO > Titles & Metas > General
Force Rewrite
You will only see this option if your theme does not declare support for the native WordPress ‘title-tag’ feature. This will likely only happen with older themes.
This is a bit of a technical setting, which may be necessary to activate depending on your theme. Sometimes there’s a conflict between the Yoast SEO plugin and your theme which may also be outputting some SEO info. The typical indication of this is duplication of information being output:
![]()
So if you have strange output like this you will need to check the “Force rewrite titles” box to resolve the problem.
Title Separator
This is a purely aesthetic setting to determine how you want your meta tags to display in the search results. The symbol you choose separates the post title from the site name in the meta tag.
e.g. Post Title | Your Site Name :

— or —
Post Title – Your Site Name

SEO > Titles & Metas > Homepage
This, and the next few tabs are the places where people tend to get confused. Before we look at the configuration details, there are a couple things to understand.
First, one must understand that one of the major purposes of this plugin is that it allows you to control the meta information for each piece of content on your site, in all the ways that WordPress displays it (homepage, single post, tag archive, category archive etc)
Secondly, “titles & metas” refers to the meta title and the meta description which determine how your site’s pages/posts appear in Google search results:

What is a meta description or meta title template?
Ideally you would handcraft the title and description for every single page or post. But if you’re only starting this process when you already have a lot of content not yet optimized, or perhaps you have authors who you think won’t fill it in, the templates you can create in this section allow something to be output in the event you don’t handcraft it, or if you just want to “set it and forget it”. So at least you will be providing some information to Google rather than nothing at all.
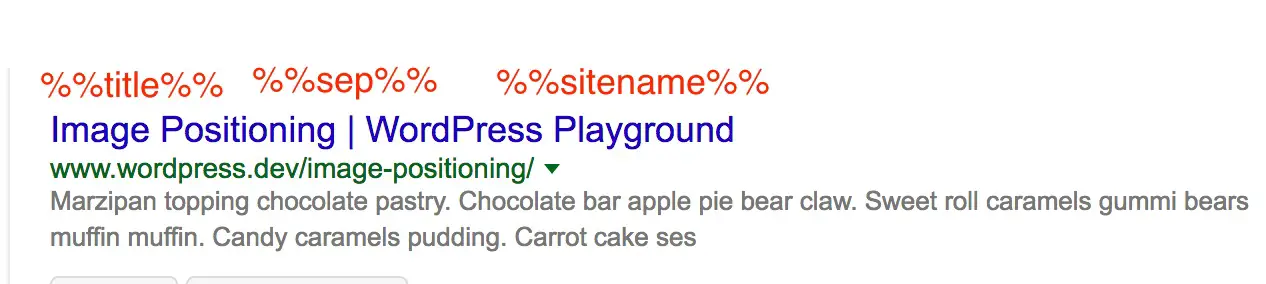
The template is created by replacing the variables you see with the content from that post.
So for example, %%title%% will be replaced with the title of the post or page in question. %%sitename%% will be replaced with whatever you have designated as your site title in Settings > General > Site Title and %%sep%% will be replaced with the symbol you chose as the separator in the General tab.
So if your Posts Title template is this:
The output will look like this:
The description defaults to pulling the first couple lines of text from the post/page.
All the possible variables are found by clicking the Help center tab. The defaults that the plugin sets up are fine to use for templates, but as I mentioned before, hopefully you’ll be customizing on a per post basis.
Even if you set up templates, you can still customize individual pages/post by filling in the info in the Yoast SEO box on that individual piece of content. The template just makes sure that your title and description aren’t totally empty.
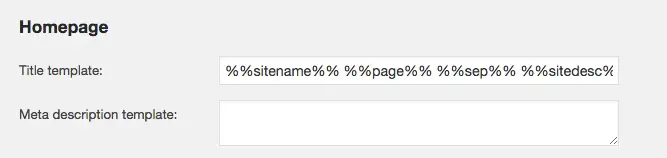
SEO > Titles & Metas> Homepage
If your site is set to show Posts on the homepage, you will see this option to set the meta title and description for your homepage:
If you have set a static page for your homepage, you will see this:

And you will be directed to use the Yoast SEO box on the edit screen of the page itself.
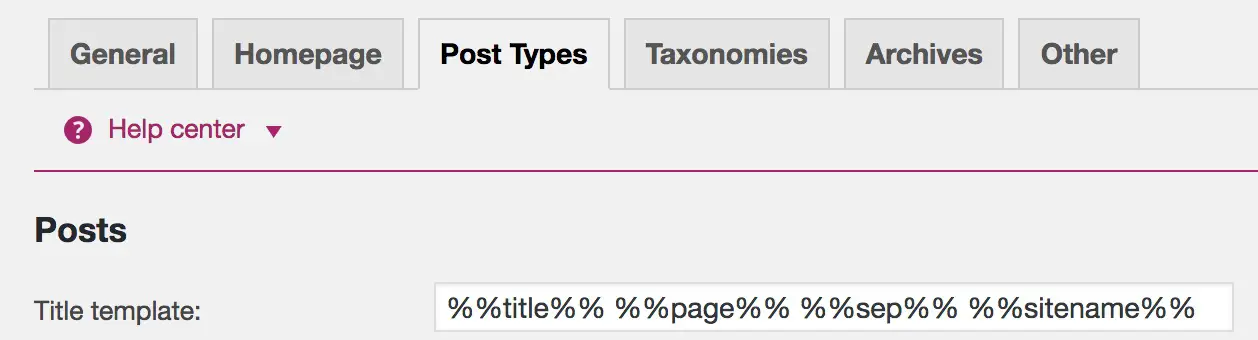
SEO > Titles & Metas > Post Types
This allows you to set up templates for the output of the meta title and description for every regular and custom post type on your site.
Meta Robots
Unless you have a specific use-case, you’ll want this set at index. Using an SEO plugin on a site that is noindexed is pointless since that setting prevents Google crawling your site. A possible use-case might be a site in development.
Authorship: You can choose to remove the authorship info per post type
Date in Snippet Preview
There are varying schools of thought on this. Generally speaking you would want to show the date in the snippet preview if you run a news-style site that has time-sensitive content. For other sites you’ll probably want to leave it set to Hide.
Yoast SEO Meta Box
This is the box that appears on the editing screen for every individual piece of content on your site, allowing you to customize the meta information for it. 99% of the time you will keep this set to Show.
If you have custom post types (such as a portfolio, or products for example) they will automatically show up here and you can customize them just like regular posts and pages. If your custom post types have archive pages, they will show at the bottom of this screen.
SEO > Titles & Metas > Taxonomies
This tab allows you to control meta information for all the taxonomies on your site such as tags and categories, in addition to any custom taxonomies generated by themes or plugins.
SEO > Titles & Metas > Archives
This section pertains to the author and date archives, which WordPress creates by default. The explanation provided by Yoast on this page is mostly sufficient, but it’s worthwhile to note that if you enable the Author archives, you will then also have the option of enabling a sitemap for the user archives. That option appears in the XML Sitemaps tab. If you disable Author archives, that option disappears from the Sitemaps tab.
When using the configuration wizard, the selection you make in Step 7 “Multiple authors” is related to these options. If you select “yes”, the Author archives will be automatically enabled, and if you select “no” they will be automatically disabled.
Additionally, you can control the meta info for your search and 404 pages here.
SEO > Titles & Metas > Other
Sitewide Meta Settings
Subpages of archives
It’s recommended settings this to noindex this to avoid people performing a Google search and ending up on, for example, page 2 of your archives, which may not be the best place for them to land. Archive pages change over time as you add new posts – so something that is on page 2 of the archives today, could be on page 3 tomorrow. It’s not ideal to have people land on these pages because they may not be able to easily find what they are looking for. You want people to always land on the most relevant page/post for their search and typically that’s not an archive page.
Use meta keywords tag?
This should be Disabled because no search engine uses meta keywords for ranking any more.
Force noodp meta robots tag sitewide
This makes sure that search engines don’t use Dmoz meta descriptions for your site, instead of the meta descriptions you will provide. These directories used to be authoritative guides to the web but now they are significantly less so, particularly Dmoz, so there’s no value in using info from those listings. You’ll want to set this to Disabled.
SEO > Social
SEO > Social > Accounts
Enter any profiles associated with your site; they will be utilized for things like Google’s Knowledge Graph. With all things social, you should assume that how these pieces of information will show up, will change over time. Facebook and Google in particular, constantly change how they use meta data (for example, Google killing off Authorship). So I recommend filling in as many details are as pertinent.
For each of Facebook, Twitter, Pinterest and Google+, Yoast SEO can provide all the necessary social meta info. You should make sure you don’t have other plugins duplicating what’s being done here. For example some social sharing plugins might have a similar feature.
For the more advanced and/or nerdy amongst you, the profiles you add in this section are output into meta tags on your site.
For example, the Twitter Username you enter ends up in the source code as:
<metaname=”twitter:site”content=”@yourusername” />
The Facebook Page URL is output as the Publisher tag: <metaproperty=”article:publisher”content=”http://facebook.com/yourpage” />
At the time of writing it’s unclear how this is being used, but the Author tag is certainly valuable. See: Personal Social Links
SEO > Social > Facebook
Add Open Graph meta data
If you have a social sharing plugin that already does this, you can set this to Disabled.
When you (or someone else) shares a link from your site to Facebook, it typically displays with a title, description and thumbnail:

If your links are not showing up with the correct or desired info, it’s probably because you have not specified your Open Graph info. This is the specific info about a page that Facebook. If you don’t provide it, Facebook is left to its own devices and sometimes that results in random thumbnails showing up when a URL is shared.
So Yoast can output that info for you, but other plugins also do it, so only enable this option if you don’t already have it in place.
To see if your site is outputting open graph info you can view the source code of your site and look for the following og tags:

Frontpage settings
This info will be used specifically when someone shares the homepage of your site.
Default settings
This is the fallback image to be used if the content being shared doesn’t have any images specified.
Facebook Insights and Admins
At the time of writing, Facebook have disabled new domains signing up for Insights, but you can use the feature with an existing Insights domain.
SEO > Social > Twitter
Add Twitter card meta data
Twitter now displays links in a similar way to Facebook, with a title and image. If you want to benefit from that, set this to Enabled. Choose either the summary card, which has a smaller thumbnail image or summary with large image.
Summary style:

Summary with large image:
SEO > Social > Pinterest
Yoast’s explanation here is clear ☺
SEO > Social > Google+
Google’s Authorship markup, which used to show your profile picture in search results is no longer used but you can use this tab to connect your site with your Google+ page.
Personal Social Links
A somewhat hidden feature of the Yoast plugin is that it adds social profile fields, for Google+, Twitter and Facebook, to the Users > Your Profile screen.
If you want to differentiate between yourself (or other users on your site) as an individual, and your company, you can use these fields for your personal social profiles. At least for Twitter and Facebook these values are added to the social meta data on blog posts IF you’ve enabled that meta to be displayed, in the social section.
Twitter:
<metaname=”twitter:creator” content=”@yourusername” />
Facebook:
<metaproperty=”article:author” content=”facebook.com/yourusername” />
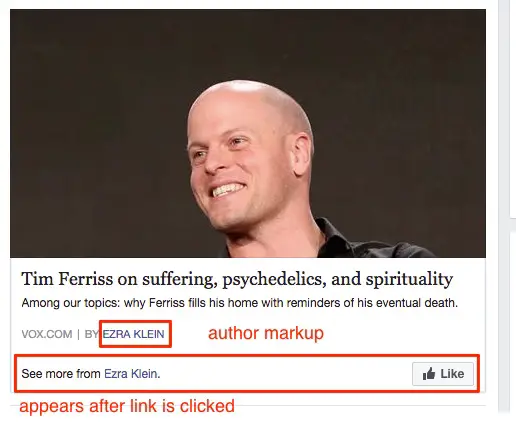
If you want everything to be associated with your company and not yourself, you can use your company page here. This field is important to fill out if, when links are shared on Facebook, you want a link to your Facebook page included, and a Like/Follow button also embedded.
In the screenshot below, it’s the Author property, when set to your Facebook page, that produces the “by Ezra Klein” attribution, which links to his Facebook page. The “see more” line appears after you click the article link from your Newsfeed.
XML Sitemaps
SEO > XML Sitemaps > General
Having an XML sitemap helps Google find all of the content on your site quickly and efficiently. The XML sitemap automatically updates as you add new content. This type of sitemap is designed for bots not humans. Read this post for an understanding of the difference between XML and HTML sitemaps.
Note that Yoast SEO used to have a shortcode to generate an HTML sitemap, but that feature is no longer available in the free version of the plugin.
Once you’ve enabled the sitemap, you should submit the URL to your Google Webmaster Tools account. Inside Webmaster tools, from the nav menu on the left, click on Optimization, then Sitemaps. You will see the Add/Test Sitemap button at the top right. Click that and then Submit Sitemap. Add your sitemap URL and you’re done.
Post Types / Excluded Posts / Taxonomies
If there are certain post types that you never want to include in your sitemap (because you don’t want Google to know about them or index them) you can exclude them all here, but you can also control it individually per post type. For example, I don’t usually have a need to activate the Media sitemap. Nor do I usually need the Post Format sitemap.
Advanced
SEO > Advanced > Breadcrumbs
Breadcrumbs are navigational aids that help humans orient themselves within a site – understanding what section or sub-section they are in. They also provide help to bots in discovering all the content on your site. For most personal blogs, or small sites, breadcrumbs wouldn’t really be necessary. But if your site has a more complex structure that goes several sub-sections deep, or provides many ways to get to the same content, as many ecommerce sites do, for example, you may find them useful. This is what breadcrumbs look like:
![]()
All of the options in this section let you customize how you want your breadcrumbs to look and where on the site you want them to show up. However, unless you happen to be using one of a handful of themes that natively support Yoast’s breadcrumbs (Thematic and Hybrid are examples), you will have to add the code that Yoast provides into your theme. Consult this article for more guidance.
If you are a beginner uncomfortable with code, this would not be recommended. You would be best not bothering with this section. You can check if your theme has its own method of breadcrumbs built-in – many do.
SEO > Advanced > Permalinks
This is fairly advanced stuff – most users will not have need for it and can use the default settings. Yoast’s comments are pretty well detailed here.
SEO > Advanced > RSS
RSS feed settings
This is a useful feature Yoast has provided to foil scrapers (dodgy sites that automatically republish content from other sites without permission). They work by scraping, i.e. copying, the content of your RSS feed, so Yoast provides a way for you add a footer or header to your feed which contains links back to your site. This way, even if someone does scrape the content, at least you will be credited. If you’re not sure what to do here, just leave the default settings.
Tools
SEO > Tools > Bulk Editor
This provides a handy way to edit the SEO titles and meta descriptions for your content on one screen, without having to go into each individual edit screen:

SEO > Tools > File Editor
WordPress dynamically generates a virtual robots.txt file, but if you manually created one, you could edit it here.
You can also edit your htaccess but you should only do that if you know exactly what you are doing. For advanced users you can use htaccess to do redirects, security tweaks and more. It wouldn’t really be advised to make changes from within the dashboard, but this tool can be useful to easily view the file if you don’t (for some reason) have FTP access. Generally speaking, non-technical users should ignore this section.
SEO > Tools > Import & Export
So let’s say you’ve been using some other SEO plugin on your site for a long time and now everyone is telling you to use Yoast’s plugin. Will you have to start from scratch or lose all that meta data you already input in your other plugin? NO! Yoast provides an import feature here which allows you to move your exiting meta information from another plugin into WordPress SEO so that you don’t have to re-do everything. Likewise you can also export all of your Yoast data here as well.
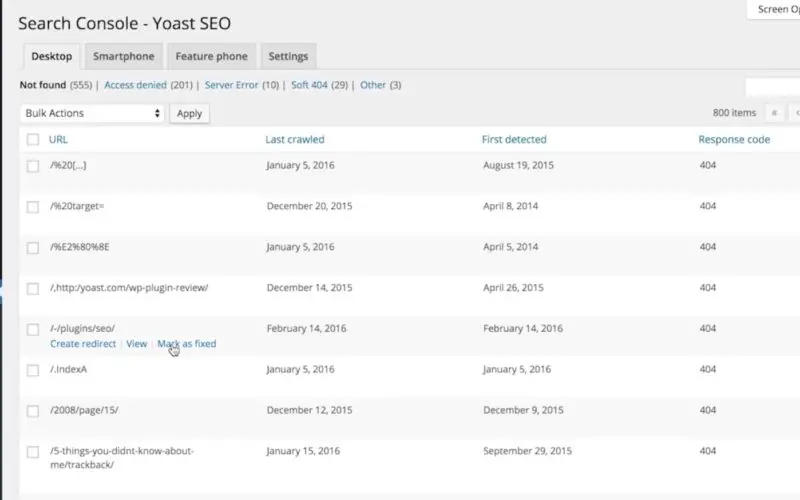
Search Console
The Google Search Console integration enables you to see any reported crawl errors right inside your WordPress site. If you have the Premium version of Yoast SEO, you’ll be able to set up redirects to resolve 404s, directly from this screen.
For the full range of information available, besides crawl errors, you should still log in to Search Console directly every so often.
Those are all the main plugin settings, as found under the SEO menu tab.
However, you’ll also find Yoast SEO meta boxes on individual posts, pages, categories etc This is where you’ll be most frequently interacting with the plugin, and what requires more of your time and attention.
Managing Meta Data for Individual Pieces of Content
Posts, Pages, Custom Post Types, Taxonomies
You will see the following box at the bottom of each piece of content you are editing:

Content Optimization
![]() Earlier in this article I talked about how the plugin allows you to create a template for your meta title and description, but that you may want to customize it on a per-post basis. This is where you would do that.
Earlier in this article I talked about how the plugin allows you to create a template for your meta title and description, but that you may want to customize it on a per-post basis. This is where you would do that.
Snippet Preview
If you set up a meta information template in the SEO > Titles & Metas section you’ll already see some information populated in the Snippet Preview area. This gives you a preview of how your post will look in the Google results pages, based on your current settings. You will notice that if you start typing something into the SEO Title or Meta Description fields, the snippet preview will change in real time to reflect the new information you are providing.
Everything should be written in human-friendly English (no lists of keywords or other tricks). The title should have your keywords for that post/page in it.
The description is like ad copy – a compelling description of the content that will encourage people to click on your result in the search results.
This is useful since in some cases you may have crafted a clever or funny post title for your readers, but that may not be the most search-engine friendly way of describing it. So the SEO title lets you give Google a more straightforward title.
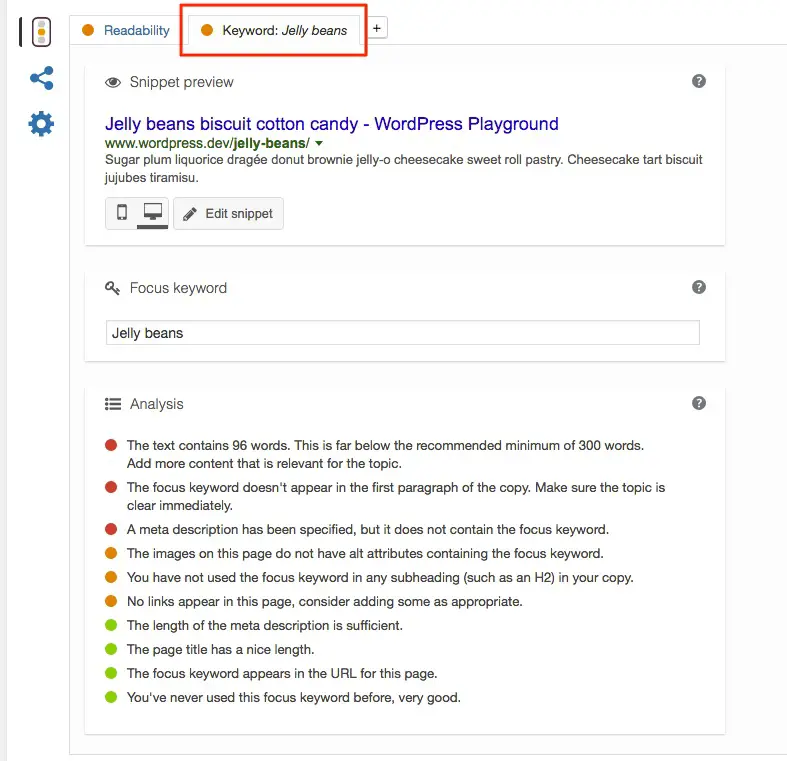
Focus Keyword
Many people on first glance get hung up on or confused by this field. Here’s what you have to understand – this is only a tool, and does not affect the output of the code on your site. Only the actual content of your page does that. If you leave this field blank, it will have no adverse effect. If you are already competent at SEO you will not need this tool, but it may be helpful for beginners.
If you enter a focus keyword (that’s one keyword or one phrase) for your post, then after saving the page you will see an analysis of the content which lets you know how well (or not) you’ve optimized this content for your given keyword.
The value for beginners is in reading the analysis, which will help you understand what it expects from you to optimize your content.
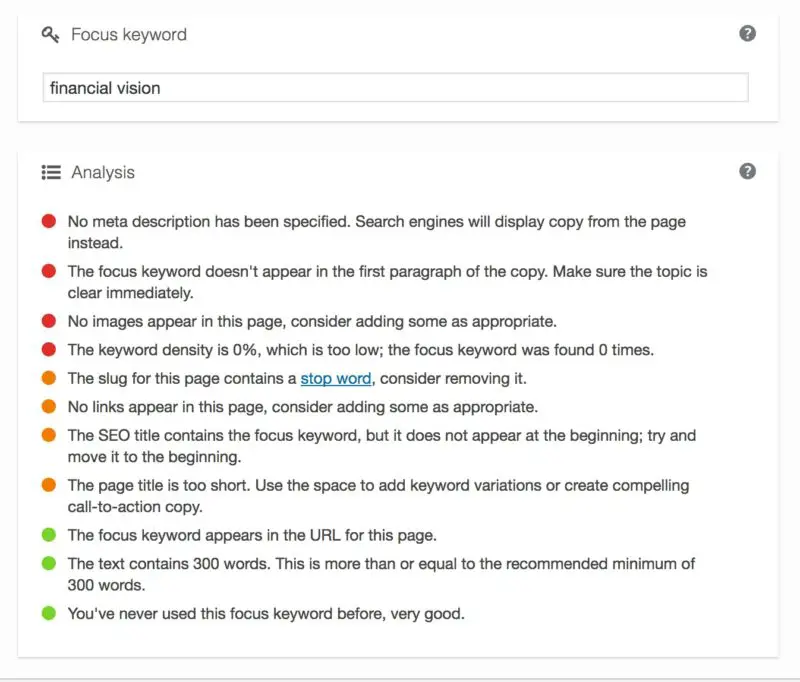
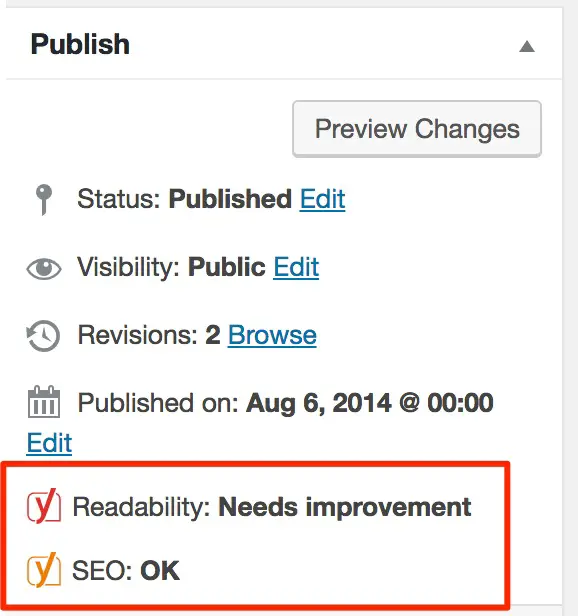 The color indicator at the top of the tab and in the Publish box shows you well you’re doing. Don’t obsess about making it turn green however; you never want to sacrifice well-written content for the sake of search engine optimization.
Each post or page should be tightly focused around one concept- that’s why you only enter one word or phrase for this to work. If you don’t know what to put it means you may not have a clear direction with this piece of content.
You only need to enter a focus keyword if you want to utilize the page analysis tool.
Social
 You will only see this tab if you enabled it in the main Social settings of the plugin.
The Social tab allows you to specify the title, short description and an image, to be displayed when your content is shared on social media. If you don’t specify this info, whatever you have created for your title and meta description will be used as the snippet, and the image could be random, depending on what images are found on your page, how big they are etc. To have full control over how your links will look when shared, you should specify all the information here.
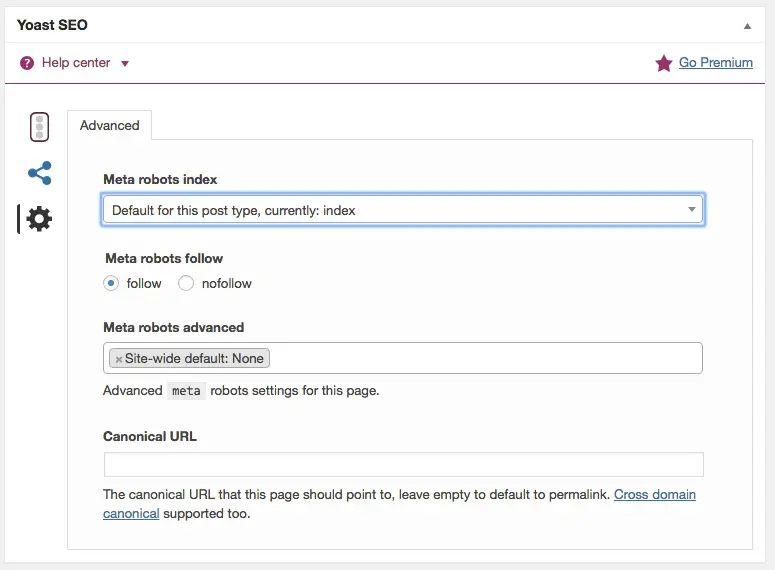
 Advanced

If enabled, this tab gives you control over the robots meta tag for the page/post, allowing you to specify if the page should be noindex-ed and/or nofollow-ed. This isn’t a commonly used setting; a typical use case might be if you are creating a landing page that you don’t want to show up in search results.
You can also control the canonical url for the page.
If you don’t know what any of these settings relate to, you would be advised not to change them!
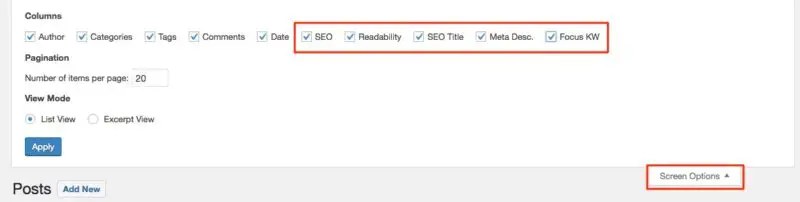
All Posts / All Pages screen
After activating the plugin, you will see some new columns show up on the All Posts and All Pages screen.
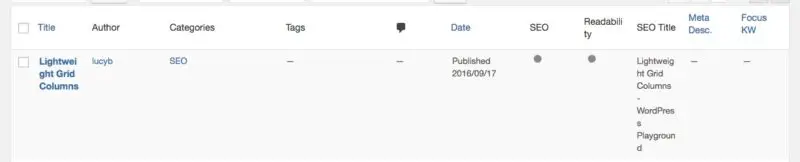
This can clutter up the screen and make it harder to read. To remove some or all of them, simply go to screen options and un-check the ones you want to hide.
If you need to learn more about the fundamentals of search engine optimization, check out my ebook:
The Beginner’s Guide To SEO For Business
Weekly WordPress Tips To Your Inbox


Such a great article, deeply explained and thank you for sharing
Very well written article / tutorial Thank you. However, I am very frustrated with Yoast. I have upgraded to the Premium version and find the only benefit is identifying relevant internal links. I continue to receive too many false negatives that I solve but the notice does not change. I am not satisfied with Yoast and am looking for an alternative.
Thanks again.
Lucy – glad to see you mentioned no-indexing author pages. I have had duplicate content issues with that in the past.
Thanks for this amazing article :)
I’ve been a Yoast user for a long time, but still you provided some unknown details.
I’m trying to determine what the grey and blue color buttons mean in the SEO column when I am viewing my site’s post directory page. I noticed that the button turns grey when I make it a no follow or no index page. Is that why the button changes color? I don’t see anywhere in the manual which defines each button color.
I was looking for information about Yoast and your guide was one of the best ones I found. I was using All in One SEO but I’ve decided to switch to Yoast. I just prefer the options provided by this plugin. Anyway, thanks for the guide, keep it up!
Yoast no longer supports HTML sitemaps. However their is a plugin that uses all of the Yoast sitemap XML settings:
https://wordpress.org/plugins/wp-seo-html-sitemap/
Super helpful, thanks!
I'm so glad I found this post! Thank you so much – it's been extremely helpful. I've bookmarked it and will be back.
Thanks and you're welcome! I need to update it a little to talk about some of the new details in more recent versions of the plugin, but all the major info is still pertinent .
Great post. Thank you very much for writing this. I have been looking for more documentation on this plugin. Your detailed explanation for each option was super. Especially liked how you called out when to leave things alone if a beginner.
By far this is the best plugin I used. Have lots of template customizing options for SEO. The better part is the per post SEO title and meta description editing ability.
Thanks for the step by step explanation.
Hey what a great, easily explained, clear guide..! You rock lady…:-)
I tweaked some of my settings after reading your guide. Things I wasn't sure of what they meant and turned out they were necessary..!
One question if I may: I just submitted my new site to google and while every page in the result shows the custom meta description I've inputed, my home page just shows content of the page and not the well written description I've created. My only hope that this will be corrected is to wait a couple of days and see if it corrects itself since I just submitted my sitemap to google, (under your instructions..thank you). Otherwise…what…any ideas…??
Thank you..definitely bookmarking your site..:-)
Very useful guide thank you!
Thank you for the information I need is available at your blog.
Previously I was using an all-in-one seopack, because this plugin is not complete, so I tried switching to the Yoast SEO plugin.
The definitive guide. Thank you very much!
Thank you. This was very useful and well explained!
Thank you for this article. I just went through it as a step-by-step checklist for a news aggregation website I built to house post from around the web. I will also eventually add it to my website that talks about WordPress. Thanks again!
Thank you so much for this great post. I just installed Yoast on 3 of my sites, and WHAT a difference it is making already! I am excited and will be checking back here when ever I find something that confuses me. I think that Yoast is a kick butt SEO platform and recommend it to anyone that is looking for an SEO plug in!
Awesome overview thanks. Helped clarify af ew things.
I'm still not 100% clear on the Facebook page stuff, but I've added my account anyway and I guess I'll just leave it hooked up. I guess there's just some analytics going on through the connection I'm not aware of yet.
Great guide. You rock! I was looking for a simple, well-explained guide to send people to and this is perfect.
Thanks Tim! I'm glad you find it useful!
Thanks for sharing this WP plugin guide!..It appears awesome and just what I need.
Just installed this plug-in. This is exactly what I need. Thanks a million