How to Install and Set Up WP Rocket

I’ve been working with WP Rocket’s support team for a number of years, so I’m not only intimately familiar with the plugin, but I’ve also seen a lot of mistakes that customers make when they attempt to use it.
Even though it’s one of the easiest WordPress caching plugins to use, speed optimization is inherently technical and complex. It’s common to get confused or overwhelmed when using optimization plugins.
But here you have the “ultimate” guide, from the horse’s mouth. Even if you don’t use WP Rocket specifically, many of the guidelines apply to caching plugins in general.
Table of Contents
Before you get started you may want to take some baseline speed tests using PageSpeed and GT Metrix so you can compare the improvement before and after using a caching plugin.
How to Install WP Rocket
WP Rocket is a premium-only plugin so you will not find it by searching the plugins directory from inside your WordPress site.
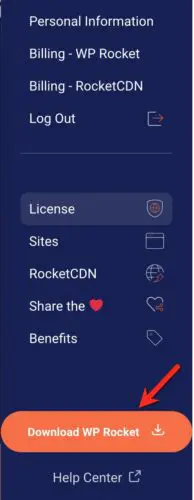
You have to purchase a license from https://wp-rocket.me. Beware of pirated versions. The WP Rocket site is the only official place to purchase the plugin.
After you have purchased the plugin, you will have access to your WP Rocket account. There you can download the zip file.
Now go to your WordPress site and go to Plugins → Add New → Upload plugin and upload the zip file.
You do not need to input an API key. When you activate the plugin the licensing happens automatically in the background.
If the license validation fails it’s often because your server’s firewall is blocking the connection.
If your license allows and you want to install WP Rocket on other sites, don’t copy the files via FTP. Install from a fresh copy of your zip file.
Getting Started
When you activate the plugin a few things happen automatically:
- Page caching is activated
- Mobile caching is activated
- If your site has an htaccess file it is modified with optimal rules for browser caching, GZIP compression etc
A few basic features are activated:
- Cache preload
- Preload links
- Google Fonts optimization
- Emojis disabled
- Heartbeat reduced
How to make sure that WP Rocket is working
At this point your site will already be faster due to page caching.
But in a few cases other plugins can interfere, so you should double-check to make sure it’s working.
When you are working with caching plugins, they generally won’t cache the site while you are logged-in to WordPress, unless you specifically configure it that way.
So if you simply open your site in a new tab and start browsing around, you won’t notice any difference.
Instead, you should open a private/incognito browser window where you are logged-out of WordPress.
Go to View Source then scroll to the bottom of the page and look for the footer comment:

If you are using Cloudflare this comment may have been removed by their minification. In that case you can check your server directly for the cache files.
Via FTP or your cPanel’s File Manager, go to wp-content/cache/wp-rocket/yourdomain.
There you will see a folder for each cached URL on your site.
Configure the optimizations…safely
Next, you’ll need to activate some additional options to get the best performance.
It’s important that you do this in a methodical manner so that you can immediately identify any issue and the specific feature that is causing it.
Use this process:
- Enable a feature in WP Rocket
- Open a new private/incognito browser window
- Switch to the private window and browse a couple of pages. I recommend checking on your phone as well.
- If everything looks good, enable the next option in WP Rocket.
- Check the site, rinse and repeat for each optimization.
- If there’s a problem, turn off that option.
- Consult the documentation for possible solutions. If you can’t fix it, open a support ticket.
Which optimizations should I enable?
I won’t repeat the above steps when mentioning each option here. After enabling a feature, do the above before moving on!
Start on the Media tab and enable LazyLoad for images.
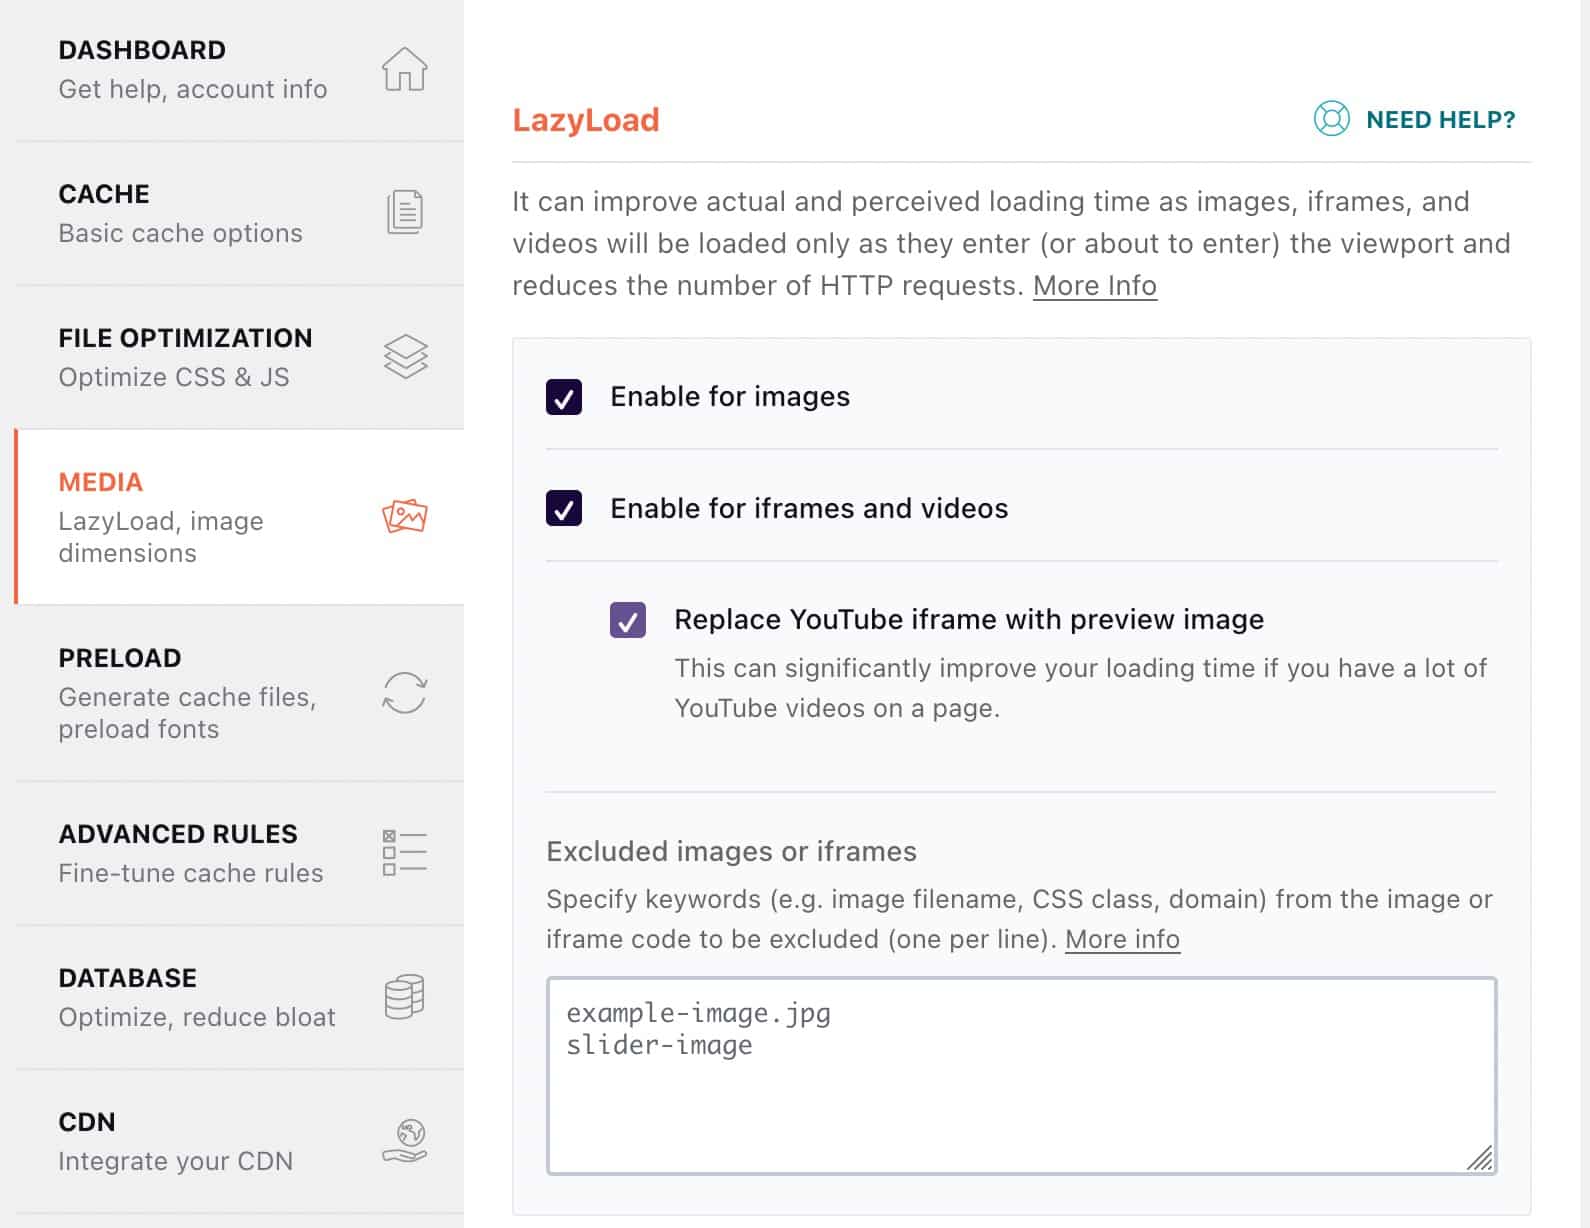
If you use Vimeo or Youtube videos, Google Maps or other content embedded with an iframe, check the box to Enable for iframes and videos as well.
For YouTube videos, the feature to Replace YouTube iframe with preview image will provide further optimization.
Test each one of these sub-options separately.
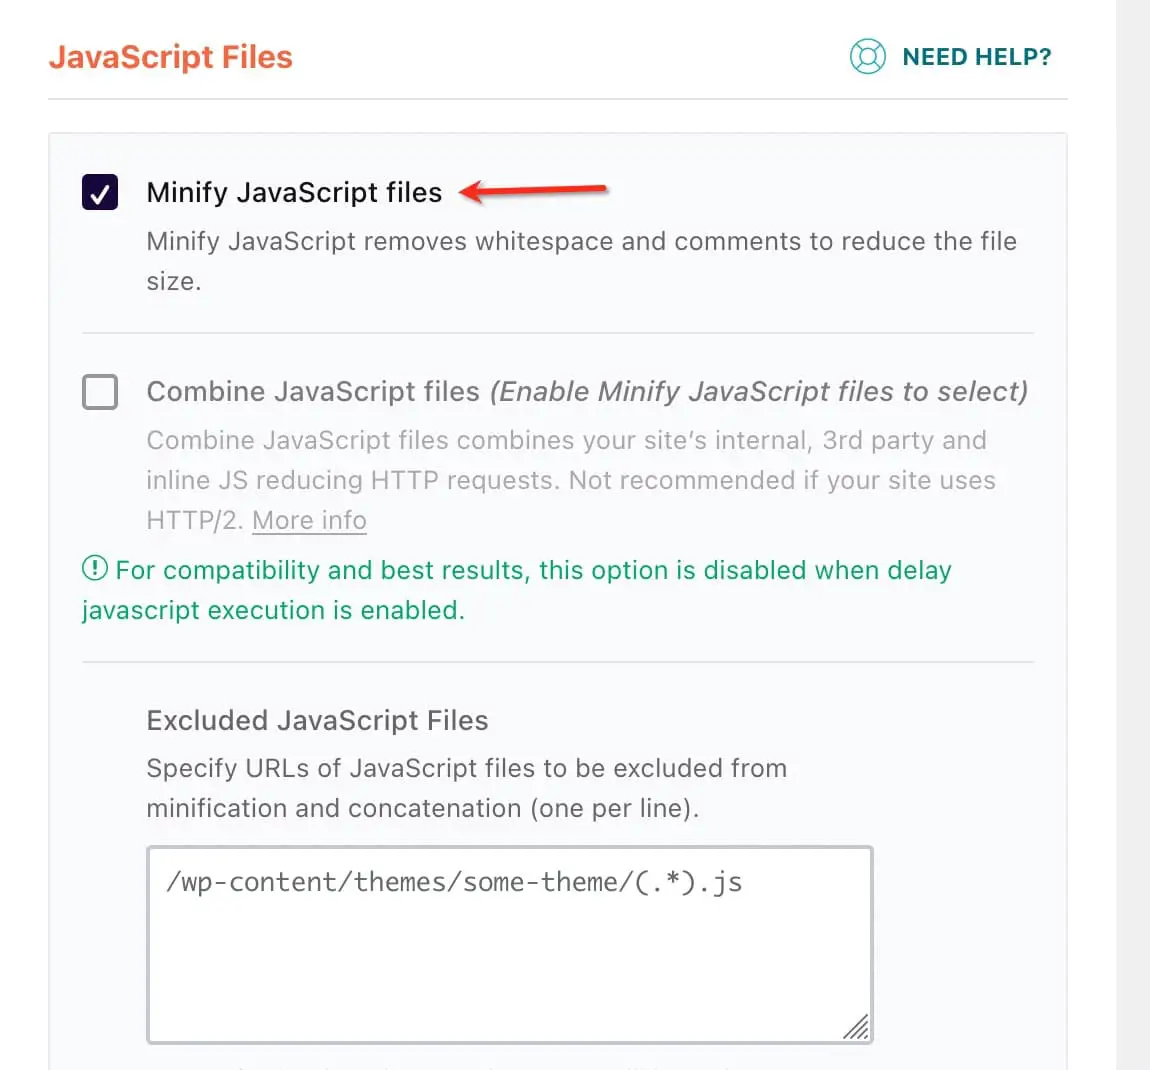
Then go to the File Optimization tab.
Enable Minify JavaScript files.
Fix Render-blocking and unused JavaScript
Next, enable Delay JavaScript Execution. This is one of the most powerful and important features in WP Rocket. It will help resolve the Reduce Unused JavaScript recommendation in PageSpeed.
It’s extra, super, important that you check your site after this one!
Depending on how your site is built, you may find that some elements don’t appear on the page until you have moved your mouse.
That means that those elements depend on JavaScript and therefore it’s expected that they won’t show up until a user interaction.
This setting will get you great performance. But, if you want certain elements of your page to load right away without interaction, they can be excluded. Understand that the more exclusions you make, the more you damage your PageSpeed score.
JavaScript is horrible for performance, so you really want to build your site without it as much as possible.
Animations, sliders etc are usually JavaScript so use them sparingly. If “above the fold” elements like navigation and sliders use JavaScript, you will end up with a lot of exclusions. Consider moving things like sliders/carousels etc further down the page. This way you will not have to make exclusions for them to load. Keep the top of the page as simple as possible.
For older versions, the most commonly used exclusions are documented here.
Newer versions of the plugin feature an easy interface for one-click exclusions:
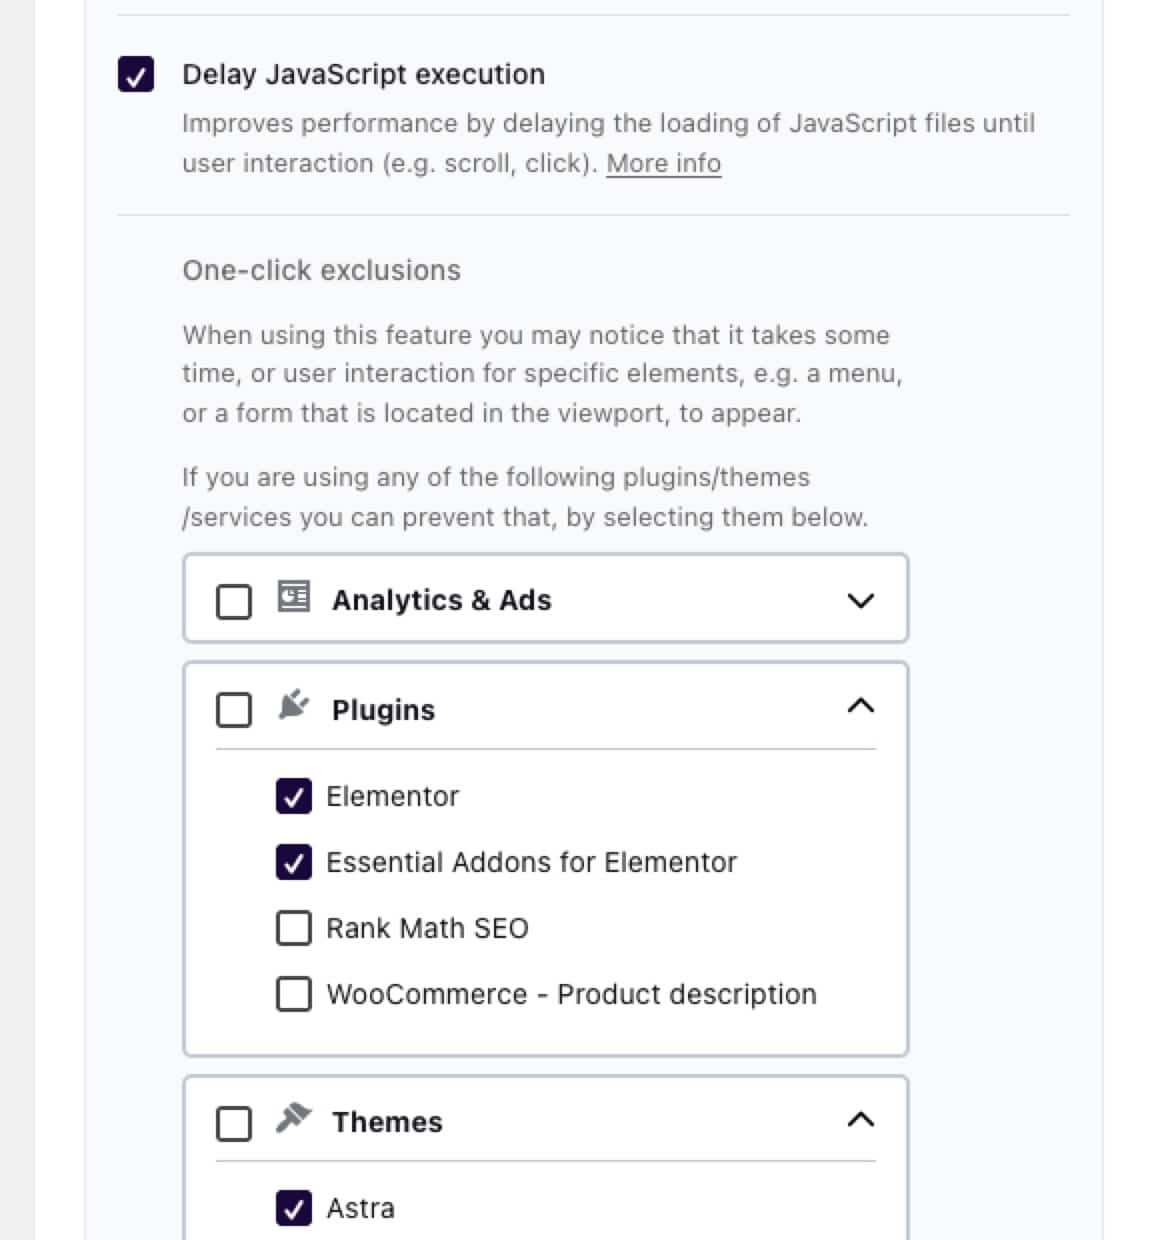
If you don’t make any exclusions, there’s no need to enabled Load JavaScript Deferred because Delay takes precedence and deferring doesn’t provide additional benefit. Although, there is no harm in enabling both.
Fix render-blocking and unused CSS
Next you should enable Optimize CSS Delivery → Remove Unused CSS
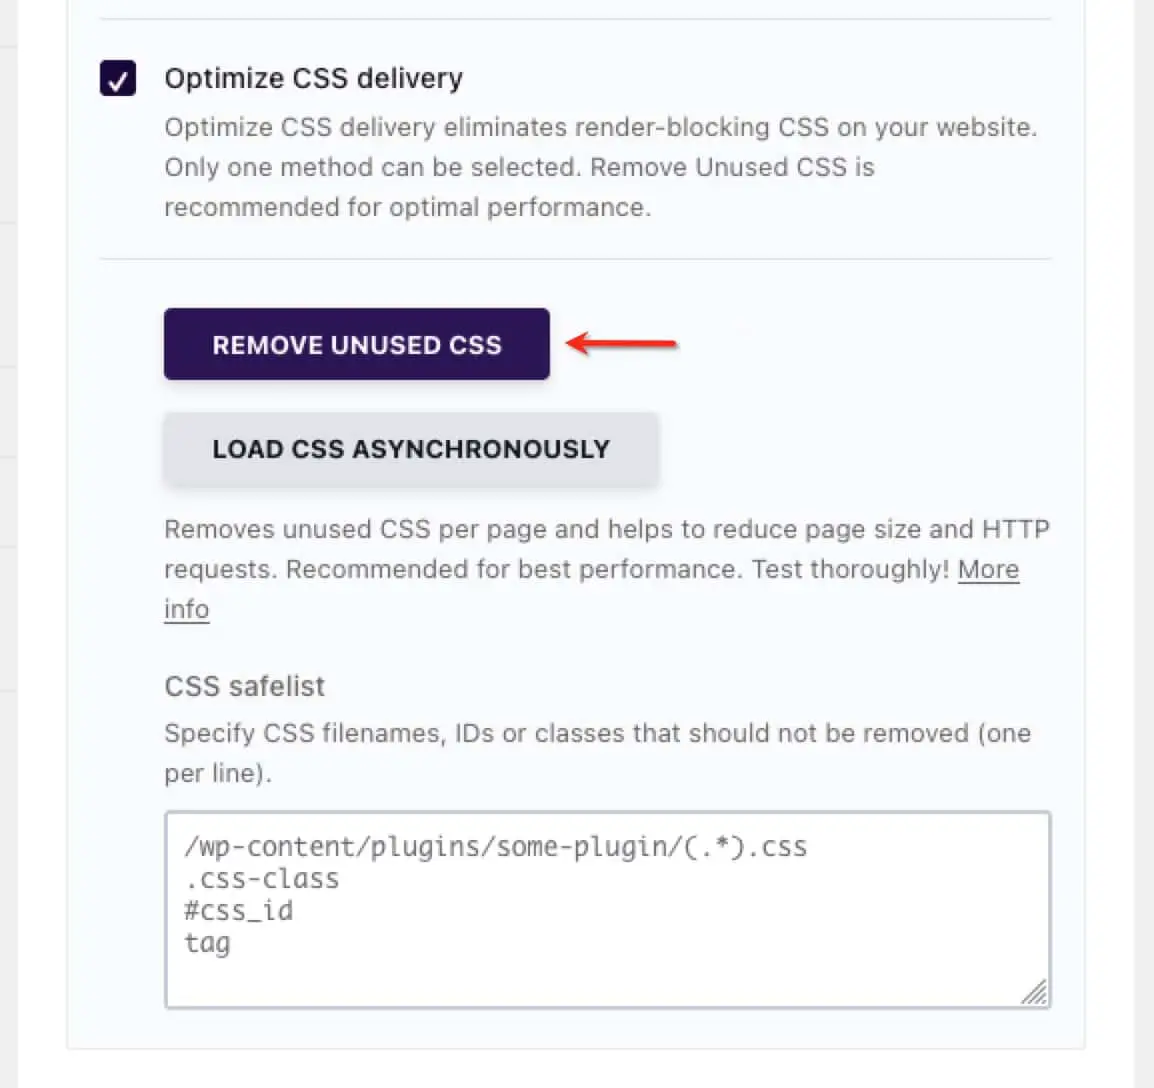
This is a sophisticated feature which requires a few minutes to visit the pages on your site, and optimize the CSS.
This will resolve the PageSpeed recommendation to Reduce Unused CSS. If you are still seeing that recommendation, the chances are that you didn’t wait long enough for the feature to process and be applied to your site.
Congrats, now you have activated the most important features and should be seeing a nice boost in performance!
What if there are problems?
If you see a broken layout or anything on your site not functioning as expected as a result of an optimization, it can be resolved with file exclusions. This part can indeed be tricky if you are not tech-savvy with some understanding of CSS and JavaScript.
If you know your way around CSS and JavaScript, you will find guidance in the knowledgebase about resolving problems, for example:
Otherwise, open a support ticket and provide specific details about the problem and where it can be seen, so the team can help you.
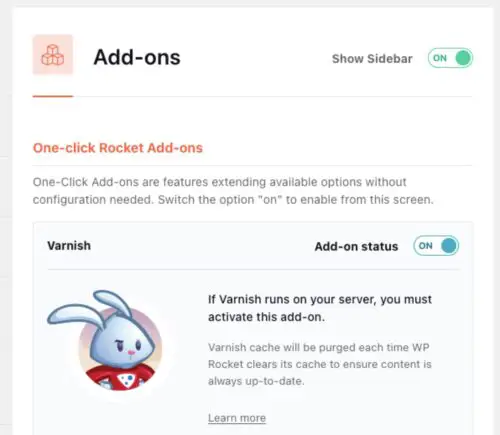
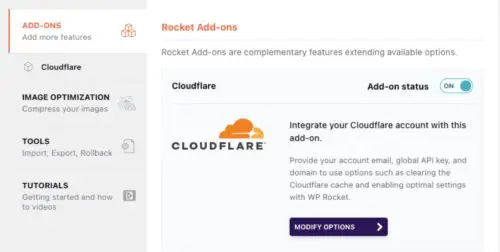
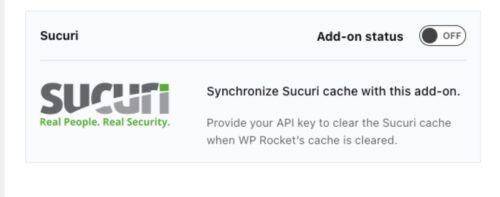
Other caching layers
If you are using another layer of caching on your site, like Varnish, NGINX, Sucuri’s WAF or Cloudflare Cache Everything, it must be synchronized with WP Rocket to avoid conflicts. Otherwise you may see broken layouts, 404 errors on CSS/JS files, outdated content etc.
If you are on a managed host which provides a cache layer, WP Rocket may already be compatible with it. Check the hosting guide.
If you are using NGINX caching, enable the NGINX helper plugin. This is a 3rd party plugin, but WP Rocket detects it and automatically synchronizes cache purging.
For the other cache layers listed below, go to the Add-ons tab of WP Rocket and activate the relevant ones:
- Varnish
- Cloudflare – works with Cache Everything, the APO service is not currently compatible
- Sucuri
Don’t add caching upon caching
A lot of people seem to think that the more caching they add, the faster their site will be. Customers write to us saying, “I’m using Varnish and Cloudflare and Cloudfront…”
This kind of setup is overkill. More caching layers do not add more speed, they just add more complexity.
Only one layer of cache will be served at any moment. Two can still work, but more than that is not advised.
Additional Configuration
Now I’ll cover the other WP Rocket options so you know if you need to use them or not.
Cache tab
Mobile cache → Separate cache files for mobile devices
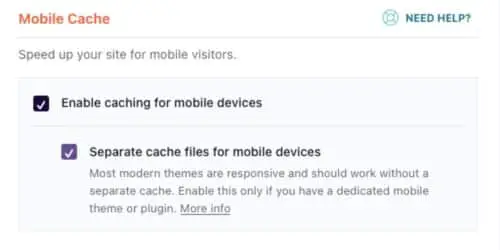
WP Rocket is aware of and automatically detects some plugins themes which require this setting and will automatically enable it.
Otherwise, if you have display issues when using Remove Unused CSS, try enabling it to see if it helps.
If you’re unsure whether to use this option or not, enabling it is the safest choice.
User Cache
Only enable this if your visitors need to login to your site to see content. Otherwise it’s better to leave it off.
Cache Lifespan
The default 10 hours is good for most sites. If you have a large site with 1000s of pages and want to minimize unnecessary cache clearing, you can set it to 0 to turn it off.
Note that this does not disable all cache clearing – the automatic cache clearing that happens when you update content, will still occur.
Media tab
Add Missing Image Dimensions
Enable this if you see the warning in PageSpeed:
Image elements do not have explicit width and height
Preload tab
Preload cache
Preload ensures your pages are cached before a real visitor accesses them. If your server lacks resources and you have a lot of pages, it could spike the CPU for your site. If that’s the case, you can disable it – pages will be cached by the first visit.
WP Rocket automatically detects the sitemaps on your site and extracts the URLs to preload. Any page that gets cached, even if it’s not in the sitemap, will also be added to the Preload database.
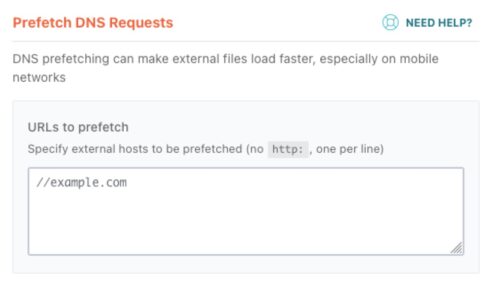
Prefetch DNS requests
This is not a critical optimization and you won’t see a huge benefit from it. It’s useful when your site loads scripts and files from external domains.
Preload Fonts
If you are using Remove Unused CSS, which you really should be, you won’t need this feature because it’s handled automatically.
If for some reason you are not using Remove Unused CSS, you can preload fonts recommended by PageSpeed.
Advanced Rules
Never Cache URLs
The most commonly used option here is the Never Cache URLs field. You can exclude pages which shouldn’t be cached, like custom login pages, registration pages etc.
Cache Query Strings
A URL with a query string has a question mark with some values after it, like this:
domain.com?s=hello
S is the query parameter and hello is the value. These kinds of URLs are not cached by default.
You may need to use this feature if you have, for example, a WooCommerce store with filters that produce URLs like this:
domain.com?attribute_pa_color=red
Enter each parameter that you want to cache. In this case you would enter: attribute_pa_color
Database Optimization
A bloated database can slow down your site, both on the frontend and the backend. You can perform important cleanups in the optimization tab.
If you need more granular control than the options provided here, it’s no problem if you install a dedicated plugin to do that.
CDN
If you are using Cloudflare, or any “cdn” service that requires you to point your DNS to that service, then you don’t need to use this tab.
The CDN feature for services like Stackpath, KeyCDN etc. You just need to enter the CNAME provided by your CDN service, and WP Rocket will rewrite links to your files, so that they use the CDN.
A lot of speed optimization articles out there will list a CDN as a method to speed up your site. In reality it’s not a requirement. A CDN is most appropriate and helpful for sites that have global visitors. Otherwise, if you have local visitors and a solid server located near them, you probably won’t get much benefit from a CDN.
Add-Ons
WebP
WP Rocket does not convert images to WebP, but if you have already done that part, the WebP addon will create a dedicated cache file to serve WebP images.
In reality, most plugins that convert images to WebP also have ways to serve the images too. So this is not a required add-on.
3rd party compatibilities
WP Rocket has a lot of automatic compatibilities to try and make the experience as seamless as possible.
For example, if you are using WooCommerce, the cart, account and checkout pages are automatically excluded from the cache.
When file optimizations conflict with plugins to the point of breaking them, exclusions are done at the core level to automatically fix those issues.
There are also compatibilities with hosts. A lot of managed WordPress hosts provide their own caching layer. In many of those cases, WP Rocket’s page caching will be disabled prevent conflicts with the server cache. All other optimizations are still applied though. Some common examples of hosts that WP Rocket has automatic compatibility with are: WordPress.com, Kinsta, WP Engine.
When should you clear the cache?
WP Rocket has automatic cache clearing triggers built in. So you won’t have to manually clear it very often. Here are a couple of occasions when you may need to:
- After you activate or deactivate a plugin which changes something on the front end of your site
- After you update WordPress
If you find yourself clearing the cache to fix issues, something is wrong and you should go through the basic troubleshooting procedure.
How to Reset WP Rocket settings
Sometimes people fear they have messed up their sites and want to “reset”.
To do this, uncheck all options on the File Optimization, Media and CDN tabs.
You will also see the option for “Safe Mode” if you go to deactivate the plugin. This is a one-click way to disable all those options.
If you are still not seeing your site go back to normal, then it’s likely you’ve got another cache layer in place which is showing you an outdated version of your site.
WP Rocket doesn’t make permanent changes to your code. So there is never any need to restore from a backup or anything drastic like that. Again, if you feel you need to do that, it’s more likely that there’s another cache layer to purge.
Troubleshooting
What to do if you think caching is causing a problem on your site.
One of the easiest checks is to see if the problem is there on an uncached page. You can easily bypass the cache to compare by adding ?nowprocket to the URL, eg.
example.com/page?nowprocket
This bypasses the cache and optimizations. So if the problem still exists at that URL, it’s unlikely to be related to WP Rocket.
If the problem occurs only on pages when WP Rocket active, there’s no need to immediately disable the plugin.
Basic Troubleshooting
Your next step is to figure out which specific optimization is causing the problem. You don’t have to be technical to do this part. It’s a process of elimination, turning off file optimizations one-by-one and checking your site (while logged out of course), to see when the problem resolves. So you can identify the specific feature.
Then you can
- Keep the feature off
- Turn it off for a specific page
- Find the necessary exclusions to fix it
I cleared the cache or disabled WP Rocket and my site is still broken
In most cases this means that you have another layer of caching active on your site which needs to be cleared.
X Feature only works if the page is excluded from the cache
It’s important to know that some types of code are not compatible with caching in general. For example, dynamic content that relies on PHP will not be compatible with any caching plugin. PHP isn’t executed once a page is cached, so the content won’t update as expected until the cache is next cleared.
For example, if you have a banner rotator on your site that is supposed to show a different image on every page load. If this is coded in PHP, it won’t work with caching. You’ll notice it shows the same image every time, until the cache is cleared. These kinds of features need to be handled with JavaScript/AJAX so that they will function as expected on a cached page.
High CPU or resource usage
If you’re having resource issues when using WP Rocket, it could be that you need better hosting. The features most likely to cause CPU spikes are:
- Preload
- Remove Unused CSS
Try disabling those to see if the situation improves. If it does, then you can try enabling them, but slowing them down.
How to get help
There is extensive documentation which is publicly available.
If you run into a problem you can’t resolve, open a support ticket.
- Make your ticket as descriptive as possible. Don’t just say “it doesn’t work” or “it broke my site.”
- Explain where on your site the problem occurs – i.e the specific URL(s)
- Include screenshots of the problem
- Don’t send screencasts unless they are very short (1 minute).
- Don’t use a video to think out loud. This usually wastes a lot of time when you could actually convey the core problem in a couple of sentences.
- Know what you want to show and say before hitting record.
With these fundamentals, you should be able to get up and running with WP Rocket without too much stress.


Hey, Lucy!
Thanks for this informative article.
Of course, WP Rocket is the best caching and speed optimization plugin, but sometimes I find that the plugin conflict with the site layout.
Especially, when you turned on UCSS and CCSS.
Overall, the plugin does well, if you know how to set it up properly.
Hi Dipak,
Yes, any optimization plugin can cause layout issues because it’s very difficult to be automatically compatible with every possible piece of code out there. However, you should contact the support team for those kinds of issues and they will help you resolve it :)