Browser Caching in WordPress

Implementing browser caching on your WordPress website improves performance for visitors who visit multiple pages or visit your website multiple times.
It allows their computer to store commonly used files in their browser which means pages can be displayed faster on those repeat visits.
Table of Contents
Browser caching vs page caching
You may have heard about page caching already. This is related to, but not the same as, browser caching.
Caching is the process of “remembering” information for fast retrieval.
Both page caching and browser caching are methods for remembering information, but they store the information in different places.
Page caching happens on your server, while browser caching happens, yes, in the browser. Specifically, in the browser of each visitor and on each device that they access your site from.
And just to clarify, by browser I mean the program or app you use to look at webpages, e.g. Safari, Chrome, Internet Explorer, Firefox etc
Let’s Cook Up A Webpage!
We can imagine browser caching in terms of making a meal. In this case, the “meal” is the webpage that you want to look at, and all the files used on that page are the “ingredients”.
Before you can make a meal, you have to check that you have all the right ingredients, and that they are fresh. You then combine all those ingredients in a specific way to create the meal.
If this is the first time you’re making this particular meal, you probably don’t have all the ingredients on-hand in your kitchen. So you’ll have to go to the store and buy them – this will of course take some extra time.
Now let’s say you want to have that same meal again tomorrow. This time, because you already have most or all of the ingredients in your kitchen, you can prepare the meal much faster.
Browser caching makes 'cooking up' a webpage faster on repeat visits Click To TweetIn our analogy, you use your browser to request a certain webpage – a specific meal.
The browser contacts the server where that webpage lives, it asks for the recipe for that page, and gets sent the list of ingredients. These ingredients are basically, HTML, CSS, JavaScript and image files.
If it’s the first time you’ve gone to this webpage, your browser won’t have any of the ingredients on hand so it has to “go shopping” and retrieve them all fresh from the server.
But when you visit that same webpage again, your browser doesn’t have to reassemble everything from scratch, it can use the ingredients it’s already stored, and only ask the server for the new things it doesn’t have.
So that’s why, the first time you visit a webpage it takes longer than the following visits.
You may have noticed this phenomenon when you do repeated speed tests, or when you use the “repeat view” on webpagetest.org. The repeat view is always faster because many of the components have already been downloaded and don’t have to be fetched fresh.
The point of browser caching is to make repeat views of a webpage more efficient.
Ingredients in your kitchen go stale though, don’t they?
They sure do, and so do the ingredients of your webpage. In terms of a webpage, “stale” means that you’ve updated something, making the cached version out-of-date.
Just like food, webpage ingredients must also have an expiration date so the browser knows whether to use them, or whether to get a fresh version, when cooking up the webpage.
When the browser gets the list of ingredients from the server, each file has a “header”. This is just some information about that file, including how long it can be considered fresh for.
This can be communicated either by a cache-control header set in seconds, or an expires header using a specific length of time. You can see both, as they appear in the browser, below:
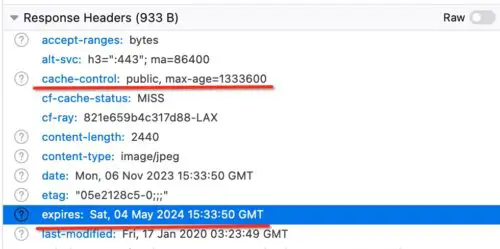
This is like checking the “sell by” or “expiration” date on your ingredients. That expiration will vary according to the type of file. The goal is to keep ingredients fresh as long as possible, to avoid those time-expensive shopping trips.
So the browser checks the expiration for the ingredients list, and then checks it’s kitchen (browser cache) to see if what’s there is stale or not. If the expiration date has not passed, the browser doesn’t need to download that ingredient, it just uses the one it already has, which is much faster.
Browser caching adds 'sell by' dates to website files for efficiency & freshness Click To TweetSometimes in Google PageSpeed or other tools, you get this recommendation:
“Serve static assets with an efficient cache policy”
What this is saying is that, these ingredients had a short shelf-life, they go stale quickly so you’ll have to shop for them frequently and that’s inefficient.
So generally, it’s a good idea to have a far expiration date so that your browser doesn’t have to do the equivalent of run out to the store all the time for a new version of that file.
Read our guide on how to enable browser caching in WordPress.
What if I change a file and the browser cache rule hasn’t expired yet?
Very valid question! There is a mechanism for this process of letting the browser know “hey, you may have cached this file but I need you to fetch it again.” This is called “busting” the browser cache.
The browser can’t check the contents of the file to see if it’s different than the contents of the file it already has in its cache. But if it detects a different filename, it will assume the file is new and download it again.
On the website side, we can use query strings for this. You have probably seen file URLs like this:
https://example.com/wp-content/themes/astra-child/style.css?ver=4.0.3
The part at the end, after the ?, is called the query string.
By changing the query string, the browser will understand that this style.css file has been changed, and will therefore download the new version of it, even if the value of the browser cache rule hasn’t yet been met.
In this way, you can make sure that all new code changes are pushed out to all visitors and won’t depend upon visitors clearing their own browser cache.
How to disable browser caching in WordPress
Themes and plugins
You shouldn’t need to disable any browser caching in WordPress if the plugins you’re using are following best practices, or if you as a developer are doing so.
The issue people can have is that they make a change to, let’s say a CSS file, but they don’t see it reflected on the site because the old version is cached in their browser.
This will only happen if you haven’t correctly versioned your files. That means appending a query string which changes when you update the file.
For example, you change style.css?ver=1 to style.css?ver=2
It actually doesn’t matter what comes after the ?
The query string can be anything, as long as it’s different than before.
By doing that you are “busting the browser cache.” That means that the browser will recognize this is a new file and download again, letting you see your changes. If you continue to use the exact same file name the browser will not understand that there is new content, so it won’t download it again.
WordPress themes and plugins have this in place and most often the query strings are the version number which updates when the theme/plugin updates.
If you are creating your own custom theme make sure you edit the theme version number in your style.css when you make an update:
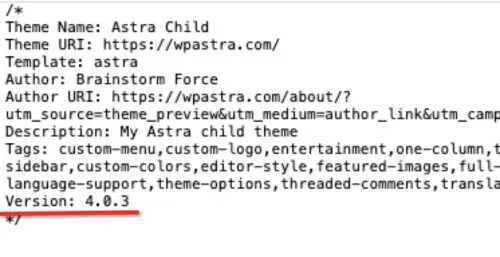
This will change the query string on the files, and all your changes will be available.
If for some reason you can’t get that to work, you could try the Cachebuster plugin. This is a very simple plugin that adds the file modification time as a query string to CSS and JS files. When the file is updated the query string will change, updating the cache of all site visitors.

Media files
Other files which could be browser cached are media files like images and pdfs. This can be trickier because they don’t have any query strings to version them, by default, and there isn’t a simple WordPress way to add and change them automatically.
In most cases you don’t update these kinds of files often. But if you need to update a file and don’t change the filename, you will run into a problem.
There is no great way to handle this in WordPress, to be honest.
Some people want to disable browser caching entirely for these file types by adding something like the following to their htaccess file:
<FilesMatch "\.(gif|jpe?g|png|webp)$">
<IfModule mod_headers.c>
Header set Cache-Control "no-cache, no-store, must-revalidate, max-age=0"
</IfModule>
</FilesMatch>Code language: HTML, XML (xml)However, that’s disabling browser caching for all those filetypes which is overkill in my opinion.
You could use a more specific rule to target a specific file, like this:
<IfModule mod_headers.c>
<FilesMatch "image.jpg">
FileETag None
Header unset ETag
Header set Cache-Control "max-age=0, no-cache, no-store, must-revalidate"
Header set Pragma "no-cache"
Header set Expires "Wed, 11 Jan 1984 05:00:00 GMT"
</FilesMatch>
</IfModule>Code language: PHP (php)
In the second line replace image.jpg with the filename you want to keep updated.
That’s still not ideal because there will be no browser caching for that file.
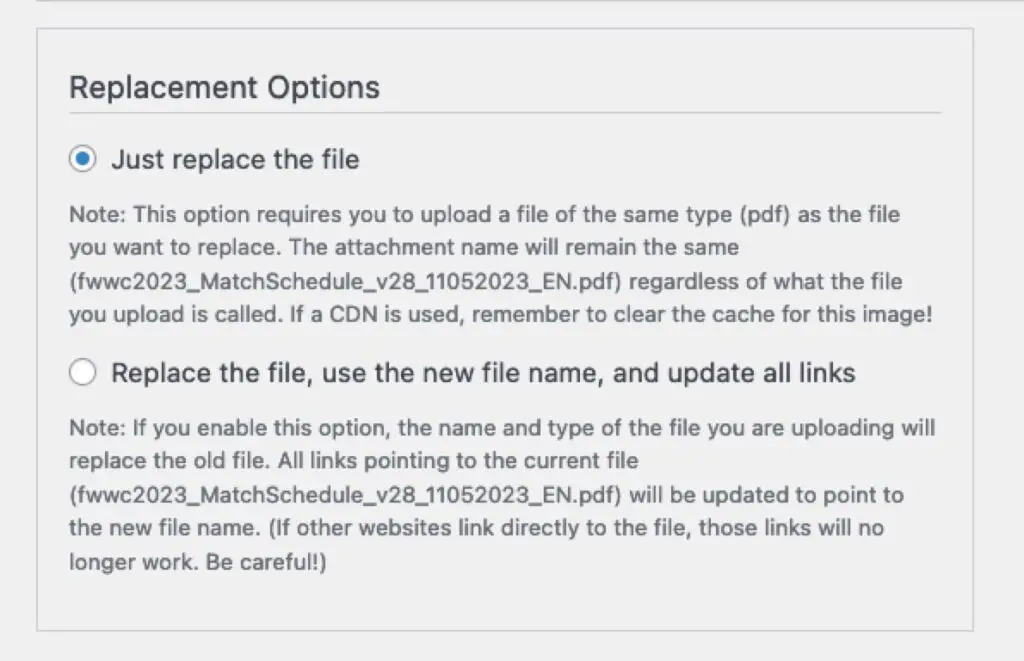
The best workaround would be to modify the filename.
In that case you would have to make sure you also update any links that point to it, to avoid a broken link. You can use the Enable Media Replace plugin to help with that.
If you are linking to a PDF you can add a query string to the file manually. To do that in the block editor, go to edit visually and manually edit the URL to add the query string:

How to clear your browser cache in WordPress
If you’ve followed along with the article so far, you’ll now realize that this question is a bit incorrect. As we’ve learned, the browser cache is not specific to WordPress.
The browser cache lives on each person’s device, so you can’t clear it from WordPress.
Each person has to clear their own browser cache on their own device. Here’s how to do it in the major browsers.